
Infrastructure-layer authentication offloading is a powerful technique that allows applications to delegate user or now, machine authentication, to AWS as a managed service with their load balancer. This approach can simplify application development, enhance security for end-users and smaller projects, and improve scalability by leveraging the capabilities of the load balancer at the edge to handle authentication tasks while the backend services focus on authorization.
AWS Application Load Balancer (ALB) has offered OIDC Authentication for user login flows since 2018, and recently announced JWT Verification support for machine-to-machine authentication (client credentials flow) in late-November 2025.
This article focuses on the user authentication use-case with OIDC v2 providers and experiment on the capabilities can help validate OIDC-issued tokens at scale.
The opinions expressed in this article are my own and are based on my experience as a cloud engineer. Moving into a new cloud region involves more than just technical considerations, which appears to be the primary experience shared here. AI was utilized in restructuring these sentences and fixing grammatical errors.
What is OIDC Authentication and JWT Verification with AWS Application Load Balancer (ALB)?
Typically, user authentication for web applications involves an internal logic within your services and requires significant development effort to implement secure authentication mechanisms with proper implementation and storage handling.
However, with AWS Application Load Balancer (ALB), you can offload this responsibility to the load balancer itself when using OpenID Connect (OIDC) providers for standard authorization code flows (client’s browser initiated) or recently simply let it verify JSON Web Tokens (JWTs) presented by clients for machine-to-machine authentication.
When a user attempts to access a protected target behind the ALB, the ALB intercepts the request and redirects the user to the configured OIDC provider for authentication. Once authenticated, the OIDC provider issues an ID token (JWT) that contains user claims. The ALB then validates this token and, upon successful verification, allows access to the requested resource. These could be helpful for scenarios where you want to centralize authentication logic at the load balancer level, reducing the complexity of your backend services.
For existing applications, minor code changes may be required to handle the headers forwarded by the ALB after successful authentication. This approach also allows authentication to be agnostic to the backend services, as the ALB handles the authentication process and forwards the necessary user information and authorization decisions to the backend targets via HTTP headers.
Let’s integrate an OIDC provider, such as LINE, with AWS ALB for authentication offloading to see how it currently works in practice.
The Lab — Setting up an OIDC Provider with AWS ALB
Before you begin, I highly recommend familiarizing yourself with the OIDC provider and developer resources, in this case, LINE.
You need to create a new application in the LINE Developers Console to obtain the Client ID and Client Secret required for OIDC authentication. Each OIDC provider will have its own steps to register an application, so refer to the LINE documentation for detailed instructions.
OIDC typically has well-known endpoints for configuration discovery. For public reference, here are the OIDC details for LINE: https://logto.io/oauth-providers-explorer/line and its discovery configuration.
Once you have obtained the Client ID and Client Secret, these can be used by ALB and your application to perform token validations. We will proceed to configure the AWS Application Load Balancer (ALB) console to use LINE as the OIDC provider.
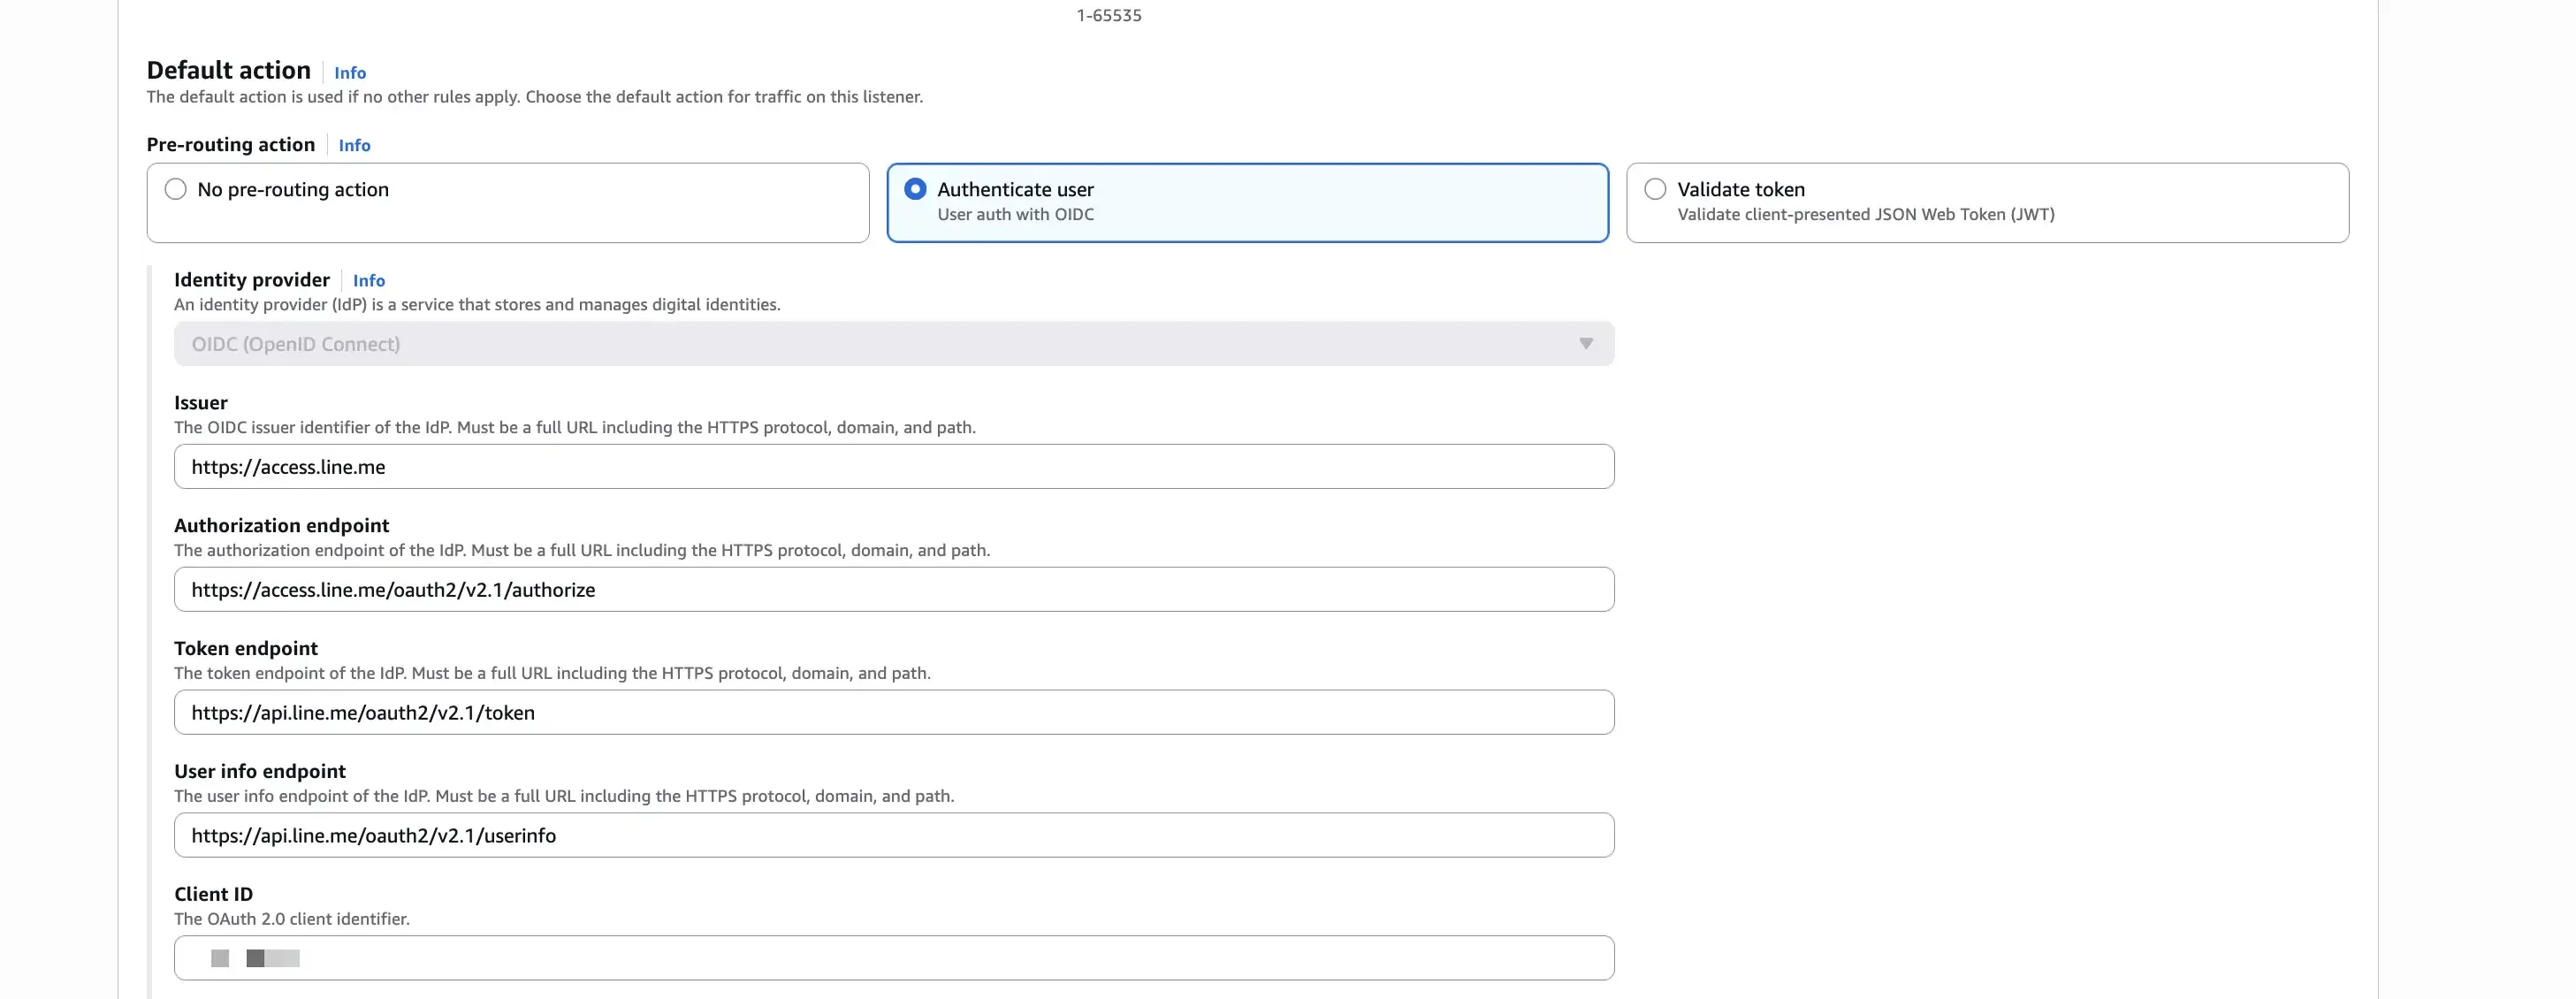
Firstly, set up a new listener rule on your ALB to authenticate users using the OIDC provider. In the authentication action, select “Authenticate users using OIDC” and fill in the required fields with the information obtained from the OIDC provider.
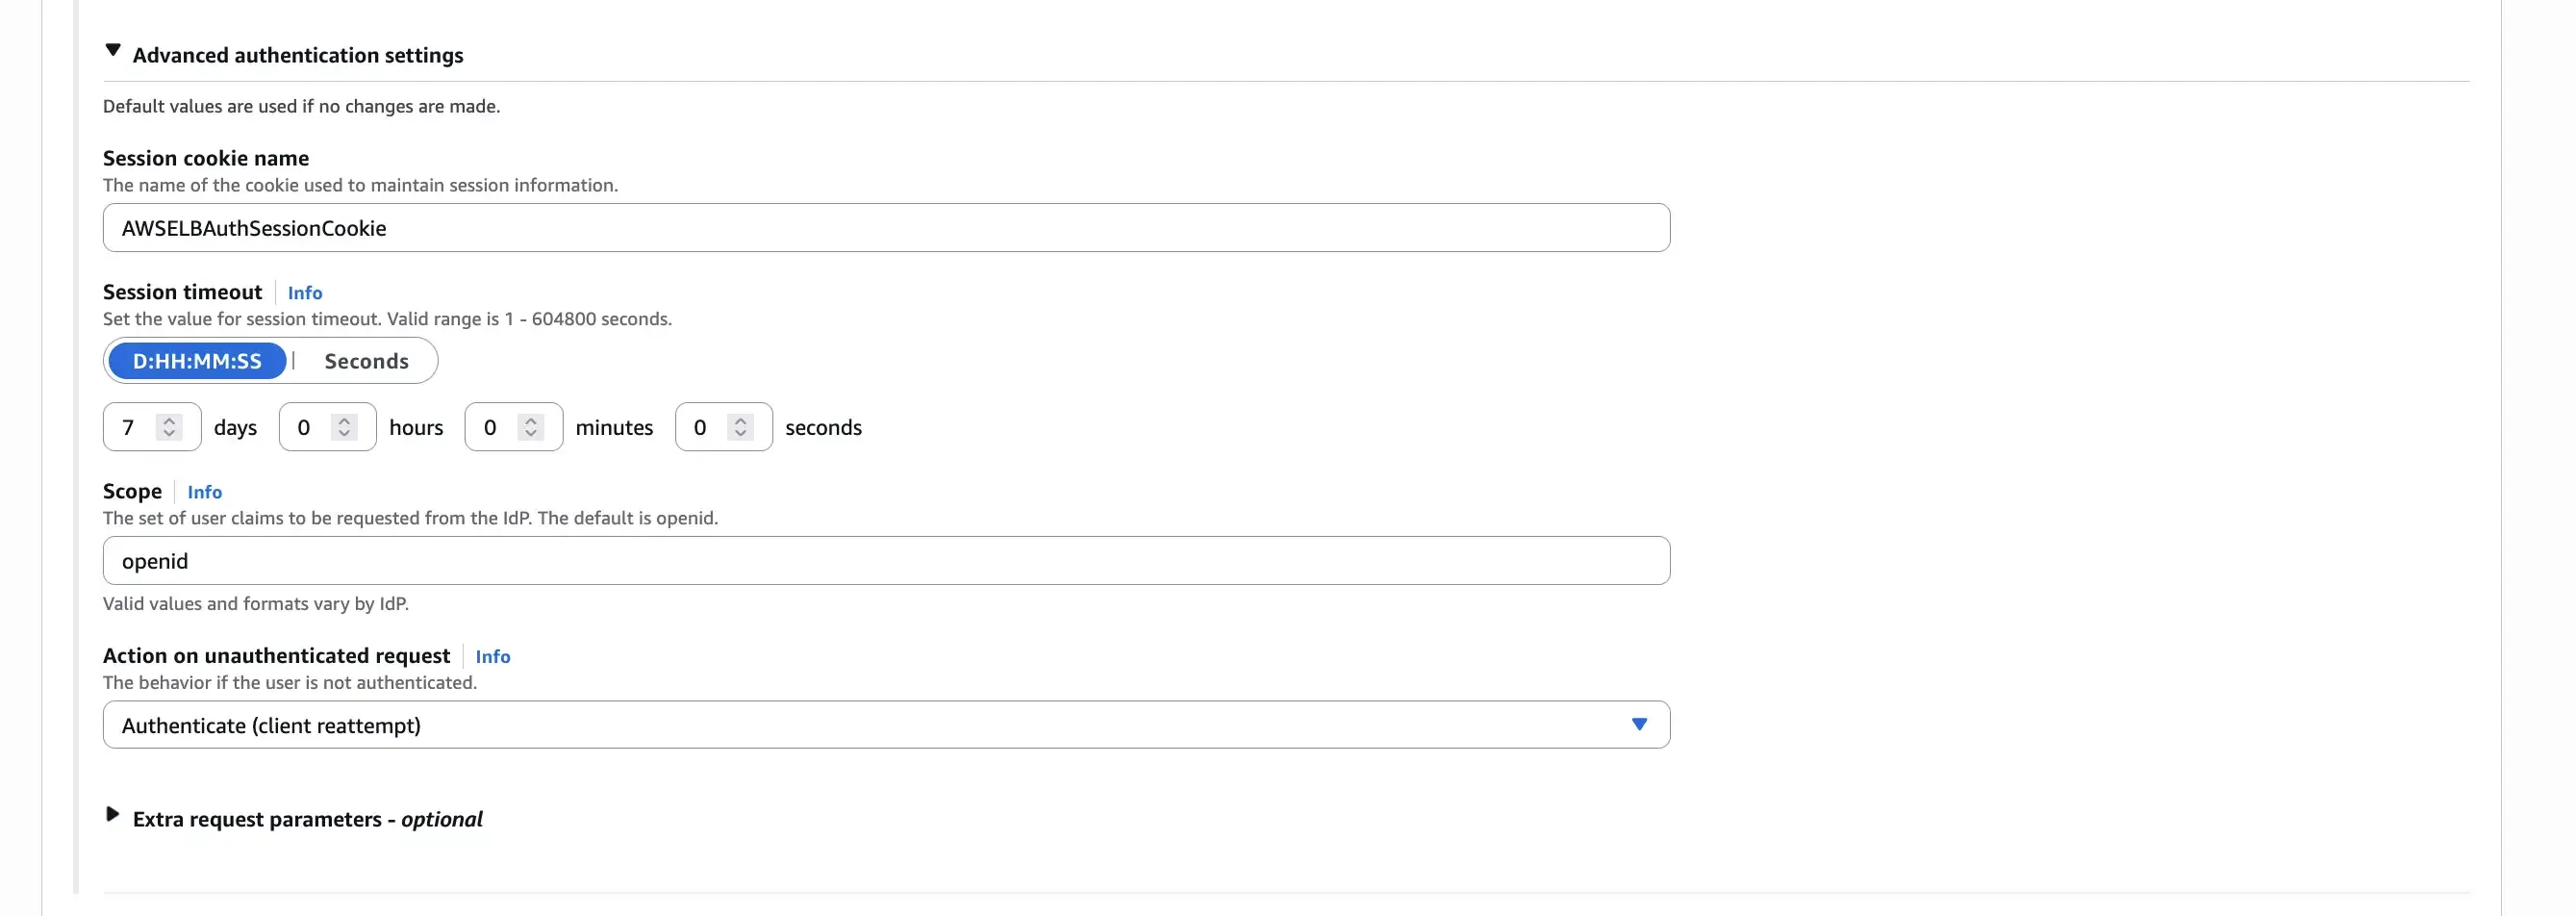
Secondly, configure the scope for the OIDC authentication. The scope defines the level of access requested from the OIDC provider. For LINE, you might want to request scopes like profile and openid to obtain basic user information. The scope configuration should be space-separated. Note that scope order can matter for some providers like LINE, so verify the order with your provider’s documentation.
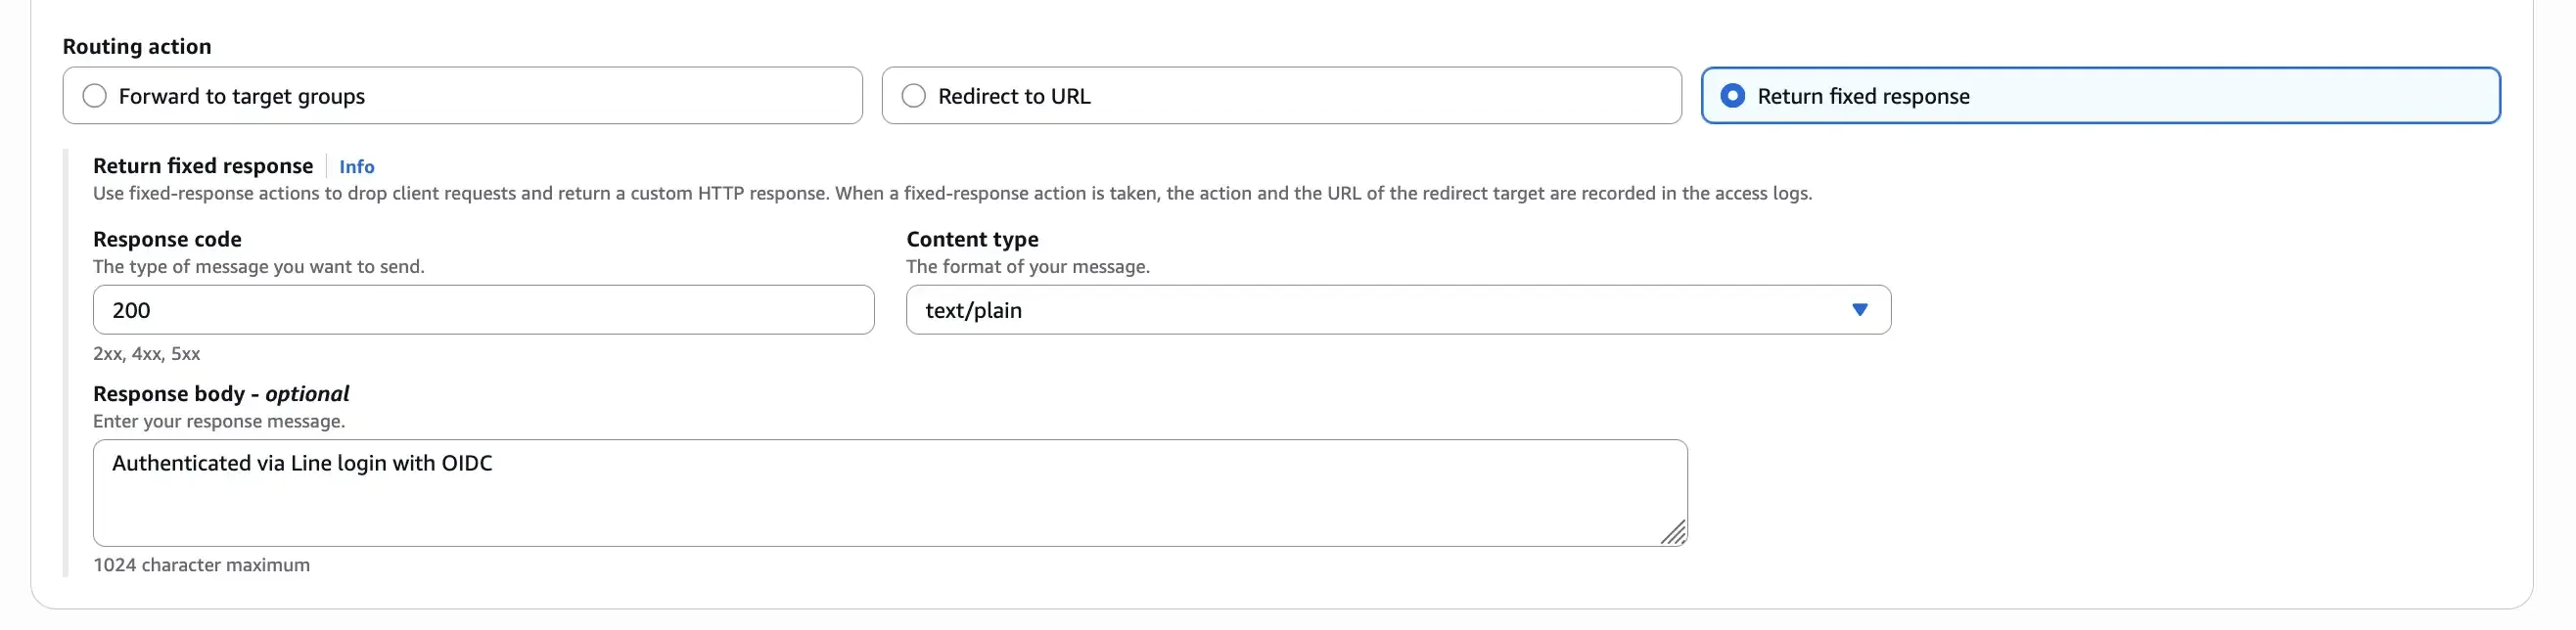
For simplicity, we can set up a mock response as the target for the listener rule to test the OIDC authentication flow. This allows us to verify that the authentication process works correctly without needing a backend service.
Let’s test the OIDC authentication flow by accessing the ALB’s DNS name in a web browser. You should be redirected to the LINE login page for authentication.

If everything is working and you see the mock response from the ALB, it means the OIDC authentication flow is successful. However, if you followed the steps above, you likely encountered one of the errors below instead!
The First Error — 400 Bad Request “Invalid redirect_uri value”
400 Bad Request
https://access.line.me/oauth2/v2.1/authorize?client_id=xxxx&redirect_uri=https%3A%2F%2Fdemo.edge.lab.com%2Foauth2%2Fidpresponse&response_type=code&scope=profile%2520openid&state=yyyyThis error is likely due to the redirect_uri parameter sent by ALB not matching the one registered in the LINE Developers Console. The redirect_uri is a critical part of the OIDC flow, as it tells the OIDC provider where to send the user after authentication. The redirect_uri used by ALB after successful authentication is in the format:
{ALB_DNS_NAME}/oauth2/idpresponse
For more details on the OIDC flow with AWS ALB, please refer to the AWS ALB documentation.
The Next Error — 401 Authorization Required
401 Authorization Required
https://demo.edge.lab.com/oauth2/idpresponse?error=INVALID_SCOPE&state=yyyy&error_description=at%20least%20one%20%27Allowed%20permissions%20%28Required%29%27%20must%20be%20specified%20in%20%27scope%27.This error indicates that the scope parameter sent by ALB during the OIDC authentication request is not valid or does not meet the requirements of the LINE OIDC provider. In this case, LINE requires at least one “Allowed permissions (Required)” to be specified in the scope. Check your OIDC provider’s documentation to ensure that the scopes you are requesting are valid and properly formatted. For LINE, the scope should be profile openid (space-separated, in that order).
What About This Error — 561 Authentication Error
561 Authentication Error
https://demo.edge.lab.com/oauth2/idpresponse?code=xxxx&state=yyyyThis error occurs after the OIDC provider returns the authorization code back to ALB, but ALB fails to exchange the code for tokens from the OIDC provider. For this scenario, the issuer URL was incorrectly set to https://access.line.me/oauth2/v2.1 instead of https://access.line.me. Ensure that the issuer URL matches the one provided in the OIDC provider’s discovery document.
How to use AWSELBAuthSessionCookie-0 from OIDC process to obtain the openid information?
200 OK
https://demo.edge.lab.com/After successfully completing the OIDC authentication flow, AWS ALB sets an encrypted session cookie named AWSELBAuthSessionCookie-0 in the user’s browser. This cookie is used by ALB to maintain the authenticated session for subsequent requests to the protected resources behind the ALB.
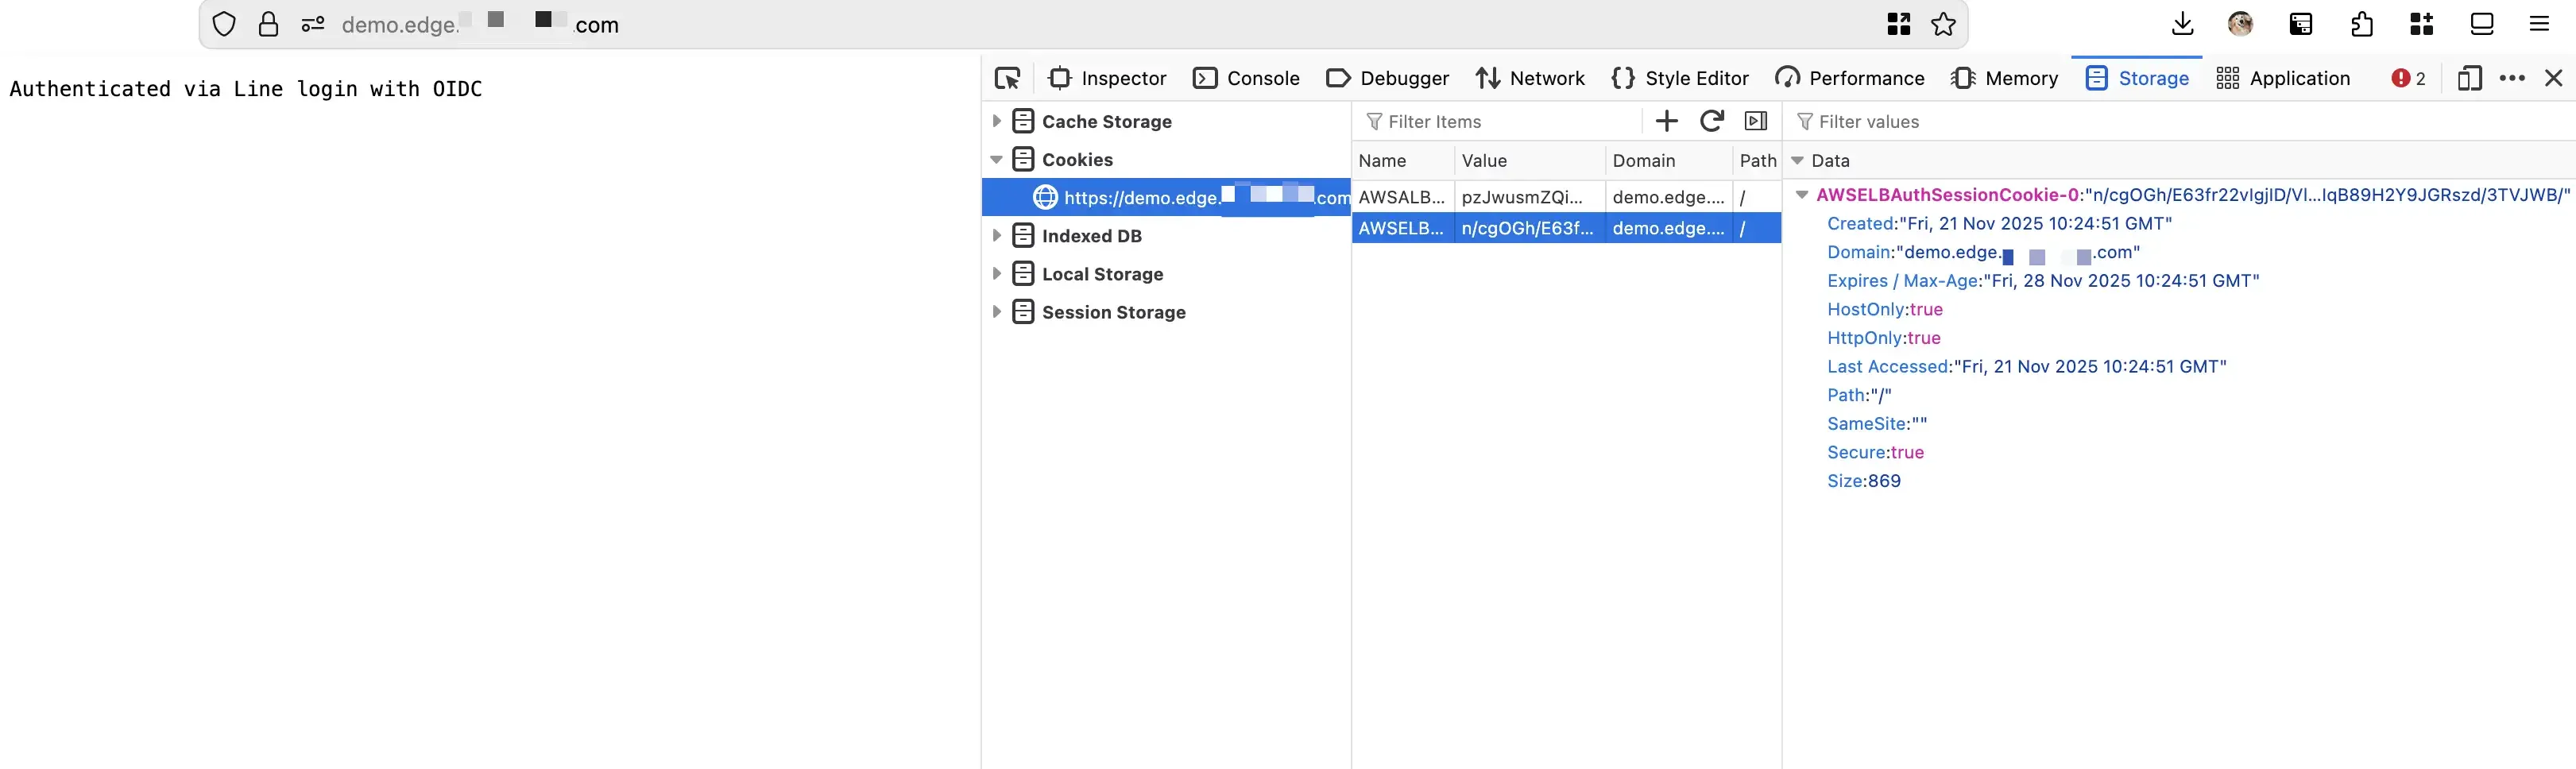
The AWSELBAuthSessionCookie-0 is an encrypted session cookie created by AWS Application Load Balancer (ALB) during the OIDC authentication process. You cannot directly decrypt or extract OpenID information from this cookie yourself—it is encrypted and managed entirely by the ALB.
Instead of attempting to decrypt the cookie, your backend application should extract user information from the HTTP headers that ALB automatically forwards with each authenticated request. These headers contain user claims that have already been validated by the ALB during the OIDC authentication process.
Authentication Headers Forwarded by ALB
When ALB validates the authentication cookie, it forwards three critical headers to your backend targets: see the AWS documentation for details.
Sample Integration using AWS JWT Verify Library
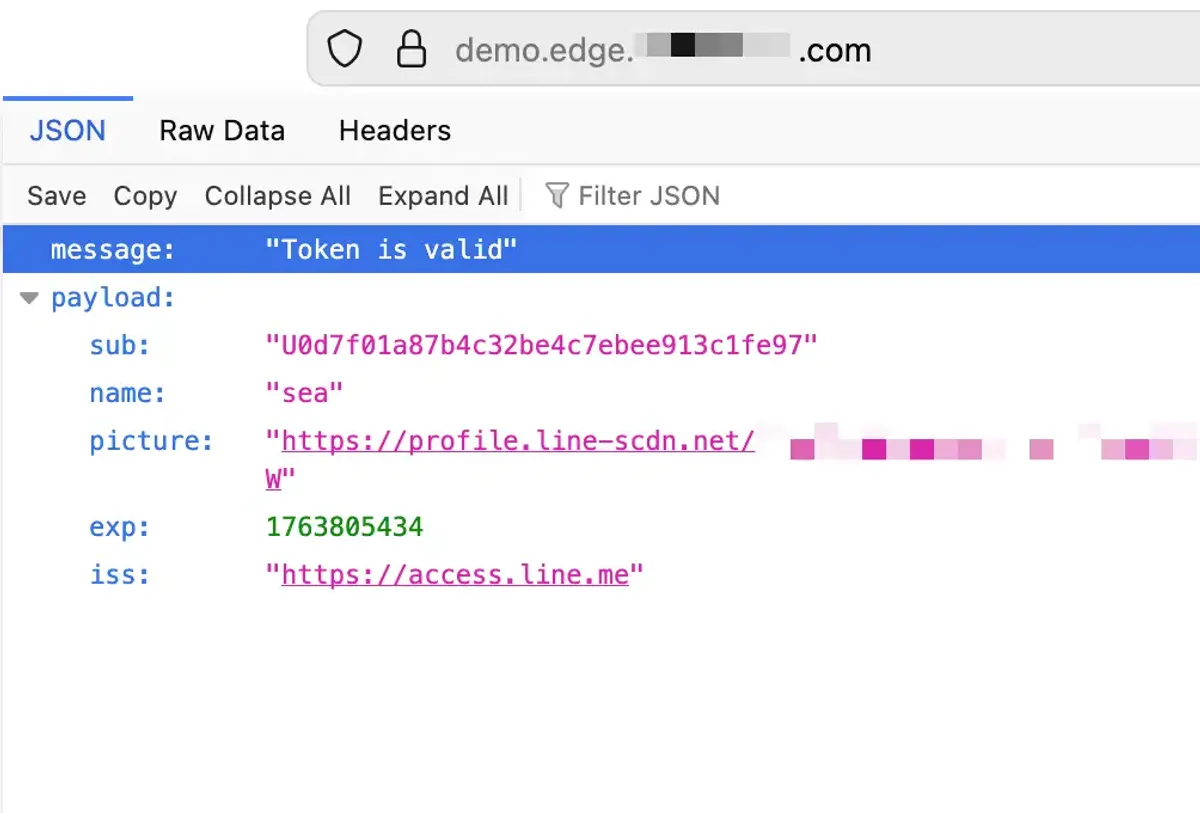
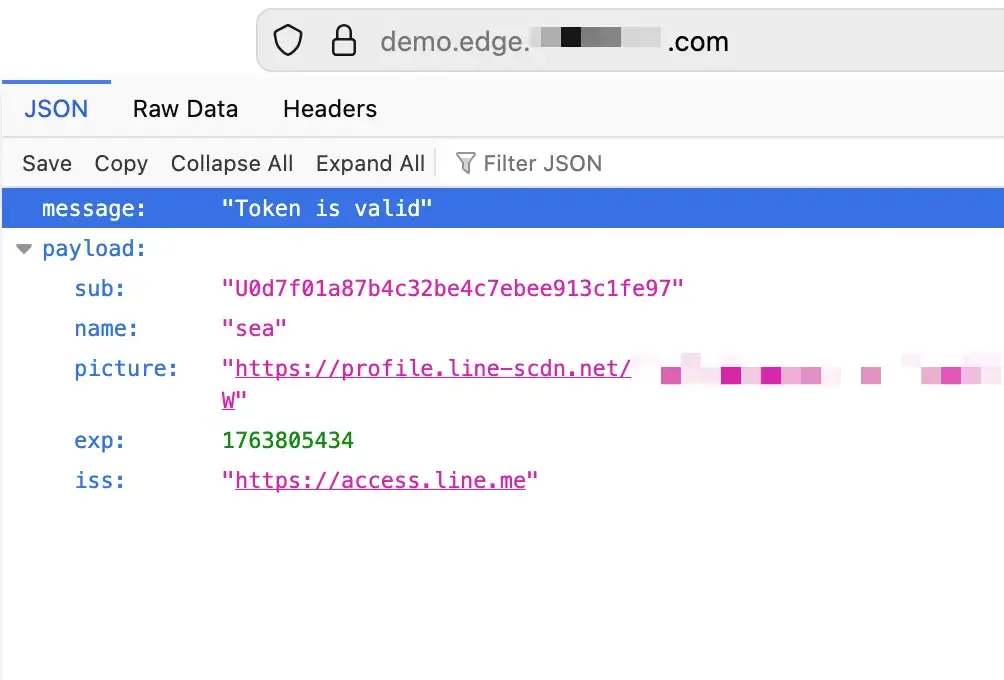
AWS provides the aws-jwt-verify library that simplifies JWT validation on the backend. Specifically, use the AlbJwtVerifier class to validate the x-amzn-oidc-data header, which contains a JWT signed by the ALB itself (not the original OIDC provider). This distinction is important: the ALB creates its own JWT wrapper around the OIDC claims for you to validate.
const { AlbJwtVerifier } = require("aws-jwt-verify");An easy way to test on the server-side JWT validation, I presume through using AWS Lambda as a mock target for the ALB:
// Location: ./src/func.js
import { AlbJwtVerifier } from "aws-jwt-verify";
let verifier = AlbJwtVerifier.create({
albArn: process.env.LOAD_BALANCER_ARN,
issuer: process.env.ISSUER,
clientId: process.env.CLIENT_ID
});
export const handler = async (event) => {
const access = event.headers['x-amzn-oidc-accesstoken'];
const identity = event.headers['x-amzn-oidc-identity'];
const token = event.headers['x-amzn-oidc-data'];
try {
const claims = await verifier.verify(token);
console.log("Token is valid. Claims:", claims);
return {
statusCode: 200,
statusDescription: "200 OK",
isBase64Encoded: false,
headers: {
"Content-Type": "application/json"
},
body: JSON.stringify({
message: "Token is valid",
claims: claims,
access: access,
identity: identity
})
};
} catch (error) {
console.log("Token verification failed:", error);
return {
statusCode: 401,
statusDescription: "401 Unauthorized",
isBase64Encoded: false,
headers: {
"Content-Type": "application/json"
},
body: JSON.stringify({
message: "Token verification failed",
claims: error.message,
access: access,
identity: identity
})
};
}
};yarn add esbuild aws-jwt-verify --dev{
"name": "my-jwt-verifier-func",
"version": "1.0.0",
"scripts": {
"build": "rm -rf dist && esbuild ./src/func.js --bundle --minify --sourcemap --platform=node --target=node24 --outfile=dist/index.js"
},
... // devDependencies
}yarn run buildUse the build output in dist/index.js for your Lambda function.
Deploy the Lambda function with appropriate environment variables for REGION, LOAD_BALANCER_ARN, and CLIENT_ID. You can then set up your ALB to forward requests to this Lambda function as a target. For more details on using AWS Lambda as a target for ALB, refer to the documentation: AWS Lambda as a target for Application Load Balancer
With profile supported by the OIDC, I will also include it in the scope by specifying profile openid in this order
Extending to Machine-to-Machine Authentication with JWT Verification
While the OIDC code authentication flow works well for interactive user applications, modern architectures often requires applications to authenticate and authorize machine-to-machine communications without user involvement. AWS ALB’s JWT Verification feature allows you to validate JWTs presented by clients, enabling secure machine-to-machine authentication.
This approach allows you to maintain both user authentication (OIDC) and machine-to-machine authentication (JWT verification) on the same ALB, with routing rules determining which flow applies based on path patterns or other conditions. This could be explored further for a more complete solution.
Thanks for tuning in! If you have any questions or feedback, feel free to reach out or leave a comment below.
Comments
I'm looking for testers for a new commenting system! Interested? E-mail me here with subject of ‘Comment System Tester’.